Building Our Dream Home: It All Began With A Tree!!
Building our home was a journey marked by both trials and triumphs. We faced unexpected setbacks and celebrated every small victory along the way. Each step forward brought us closer to realizing our dream. In the end, the greatest reward was knowing that we completed most of it ourselves, shaping a space that truly reflects our dedication, resilience, and passion.
MAIN BLOG
5/8/20249 min read
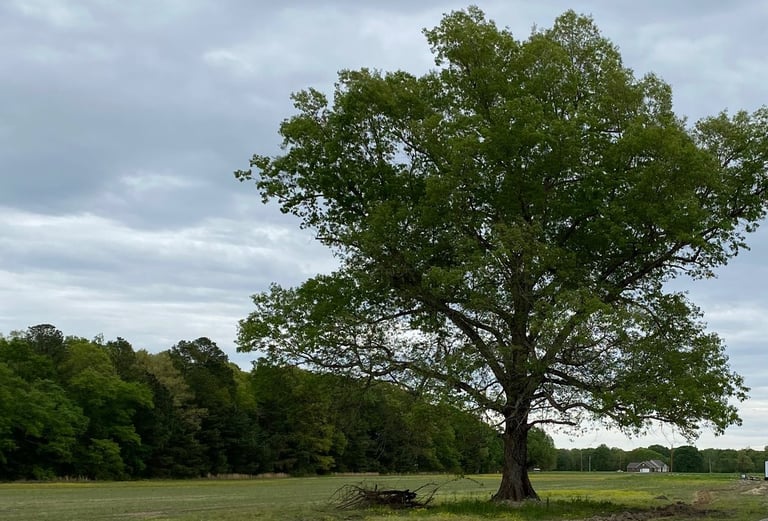
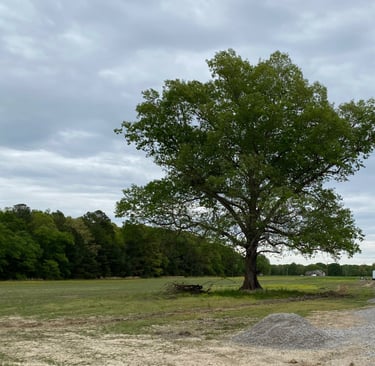
The Tree That Began It All...
Finding the Perfect Land: Our 12 Acres
The journey to building our dream home began with an emotional decision of selling our previous home. It wasn't an easy decision, since we had been living on that piece of land for seven years. The first home on it was actually hit by a tornado, you can find out more on that story here. This home was not merely a structure; it was filled with cherished memories, from laughter, family gatherings, and milestones that defined our lives. However, we had a dream to own more land where we could build a home right in the middle of it, and a good distance off the road. We also had the dream of wanting to own some farm animals, but we are still dreaming that dream.
I can remember when my husband would always point out this massive oak trees in the middle of fields when we would pass by them. He often expressed his dreams about the perfect home, stating, "Wouldn't it be awesome to have that land with a tree in the front of our house? After nearly 15 years of dreaming, my husband and I finally turned his vision into a reality. We sold our previous home and with excitement, we purchased 12 acres. There it stood: the large oak tree he had always envisioned. This new chapter in our lives fulfilled his dream and brought us hope, resilience, and a deep sense of peace in our forever home.
One thing we didn’t see coming was how COVID-19 would drive up the cost of building materials. We weren’t ready for how expensive everything got. That surprise forced us to slow down and really think through the design of our dream home. In the meantime, we bought a camper and lived in it for a few months. Luckily, we parked it next to my mother-in-law’s place, so the kids had plenty of room to run around and play.
"Camper Life: Preparing for the Build While Living Small"
Living in the camper turned out to be a surprisingly nice change. The smaller space helped us get away from the chaos of a bigger house and all the cleaning that comes with it. We actually enjoyed the simplicity—it made things feel more relaxed and meaningful. Meals, chats, just hanging out—they all felt a little more special in that cozy space. It really reminded us that having less can help you focus more on what matters, like spending real time together. All in all, it was a fun little adventure that brought us closer and helped us appreciate the simple stuff.
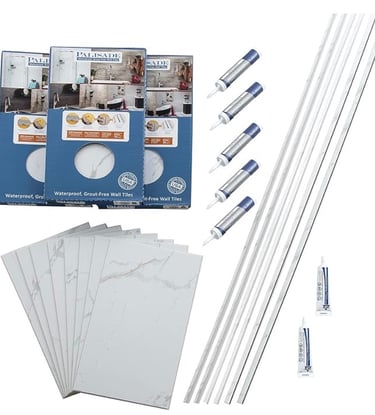
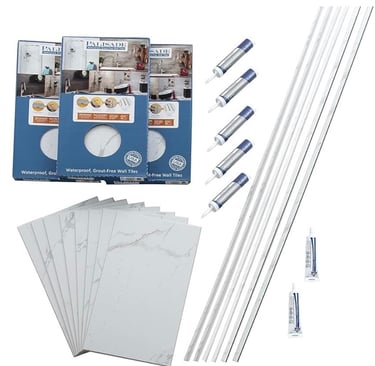
Where to buy Palasade carrara marble:


"Home in the Making: Our Year Inside the Shop"
After we moved into the camper, we decided to build a metal shop. It took a few months to put up the structure, and then a few more to turn it into a livable space—so all in all, about six months. We ended up making it into a cozy little home with a bedroom, a loft, a bathroom, and even a living room. The girls were especially thrilled to have room to play ball indoors. It turned out to be a really fun and creative season for our family that brought us even closer together.
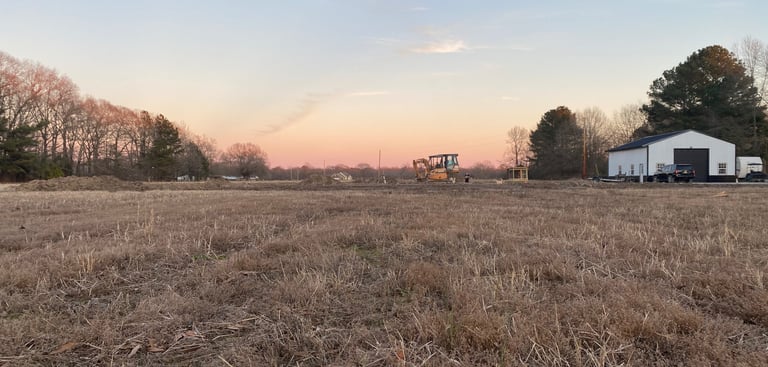
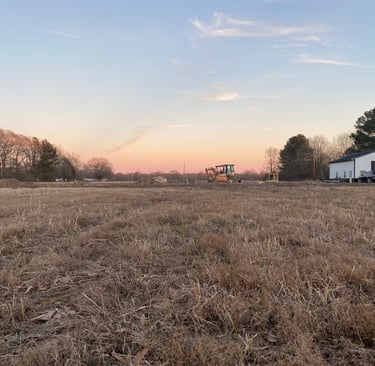
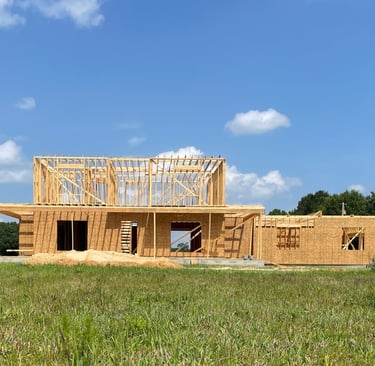
After living in the shop for a few months, we finally started the exciting journey of building our dream home. The sound of big machines breaking ground made it all feel real, and it was amazing to watch our vision slowly come to life. Once the foundation was poured, the walls started going up, turning our plans on paper into something we could actually walk through. Day by day, new pieces were added—like shingles on the roof—making it all start to look like a real home. As the walls rose, so did our excitement. It stopped feeling like just a building project and started feeling like the place where we’d make memories. The process ahead was long and a bit overwhelming, but with every milestone, we felt more connected to the space that would soon be our home. It truly felt like the start of a whole new chapter.
Laying the Foundation: A Year of Hard Work
The journey to create my ideal home was far from seamless; it was riddled with challenges that often felt overwhelming. There were moments when everything seemed to go awry, and I faced numerous obstacles along the way. A significant part of the struggle stemmed from my own indecisiveness. Picking out items for the house became a daunting task as I kept second-guessing myself, overthinking every choice I made. This tendency to complicate the simplest decisions only added to my frustrations. Despite these hiccups, I learned valuable lessons about patience and self-acceptance, realizing that perfection wasn't the goal but rather creating a space that felt like home.
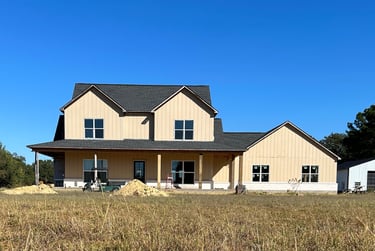
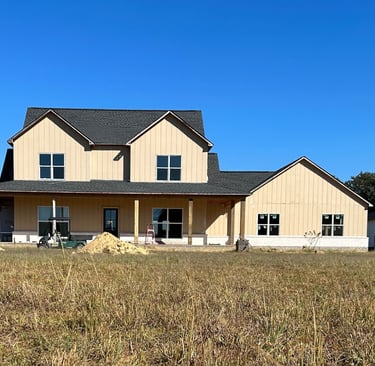
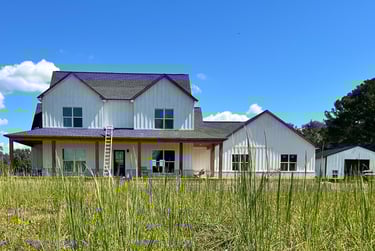
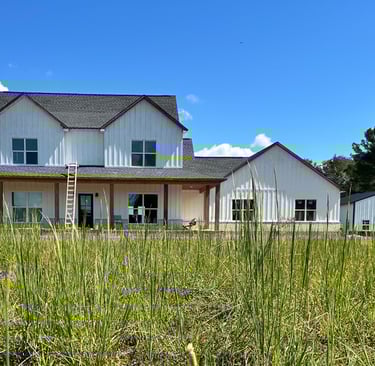
After the builders completed their work, my husband and I embraced the challenge of transforming the rest of our home. We chose to enhance the exterior with board and batten, which gave it a classic and textured look. To further elevate the design, we enlisted bricklayers to add three feet of white brick that would go beneath the board and batten, creating a striking visual foundation. Additionally, we opted for gray bricks around the base to provide a sharp contrast with the white. To finish off the look, we painted the board and batten with Sherwin Williams Pure White, a task we proudly undertook ourselves. The combination of materials and colors has truly revitalized our home’s exterior, making it a reflection of our style and effort.
Choosing Outside Finishes: From Tongue and Groove to Board and Batten
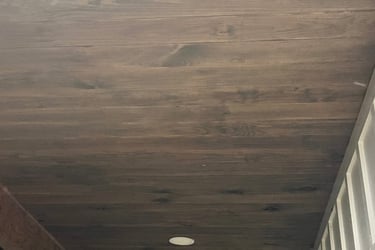
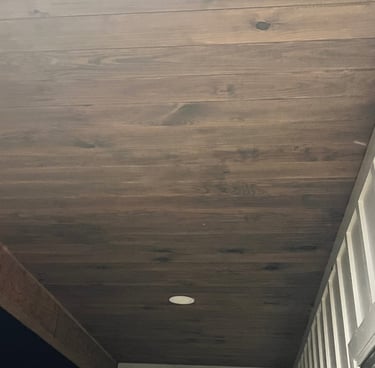
My husband and I decided to upgrade our porches by adding tongue and groove boards—a project that took a while because of how big the porches are. We started by staining the boards before putting them up. A lot of people just spray them after installation, but we wanted to take a more hands-on approach and rolled the stain on ahead of time. Once everything was stained and sealed, we tackled the installation together. We’d each take an end, wedge the boards into place, and then take turns nailing them in. It definitely took teamwork, but the result was so worth it. The porches feel warm and welcoming now, and I can’t wait to spend my mornings and afternoons out there. Eventually, we plan to screen in half of the back porch—mosquitoes get really bad at night—but sitting out there in the evening is one of my favorite things to do.
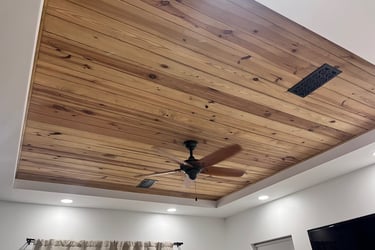
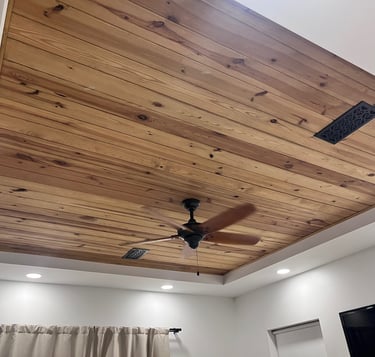
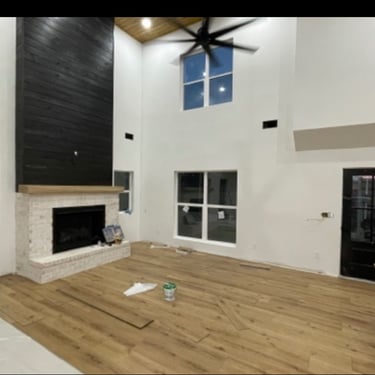
After we finished the tongue and groove on our porches, we decided to carry that look inside by adding the same detail to our living room ceiling—and it completely changed the feel of the space. The warm wood tones and texture gave the room such a cozy, inviting vibe, perfect for family hangouts or just relaxing. We loved it so much, we added it to the tray ceiling in our master bedroom too. It gave the room more character and a bit of elegance without feeling overdone. Now both the living room and our bedroom feel like warm, stylish retreats, and it really pulls everything together in the house.
Bringing it to Life: Paint and Insulation
Before our cabinets were installed, we decided to prepare the walls by using Kilz primer. I purchased a sprayer from Harbor Freight and transformed the ceilings and walls in all the rooms. The floors and cabinets were yet to be installed, so I didn’t need to worry about paint splattering on anything. To protect the windows and doors, I carefully taped plastic over them. It took a little while to get the sprayer dialed in, but once I did, the process became effortless. I managed to spray the entire house in just two days. To ensure a smooth finish, I followed up the spraying with a roller while the paint was still wet.
"Cozy Upgrades: Bricking the Fireplace & Adding Tongue and Groove to the Ceiling"
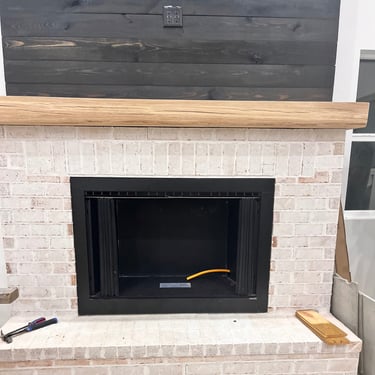
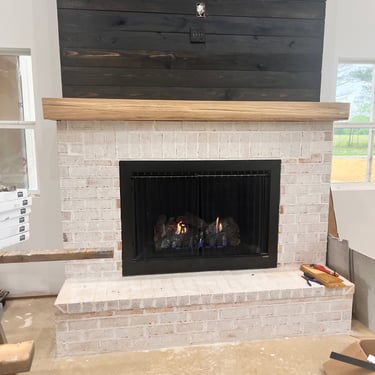
After deciding to enhance our living space, my husband and I transformed our gas fireplace area with a stunning brick layout. We hired skilled bricklayers to beautifully surround the fireplace with new bricks, creating an inviting focal point in our home. To add an extra touch of elegance, we opted for a raised hearth, also crafted from matching bricks, which not only complements the fireplace but also provides a practical seating area. For the remaining part of the fireplace, reaching all the way to the ceiling, we took on the challenge ourselves by installing tongue and groove boards and stained them black. This choice adds a rustic charm and texture, making the fireplace a true centerpiece of comfort and style in our living room. The combination of brick and wood has brought warmth and character to the space, making it perfect for cozy gatherings.
"Laying the Foundation: Installing New Flooring and Trim"
Next step was selecting the flooring. After extensive research, I chose LVP CoreTec Cairo Oak for its durability and aesthetic appeal. Once our order arrived we eagerly prepared for the installation. We did lay a moisture barrier on the bottom layer of our house on top of the concrete and a noise barrier layer for the upstairs. We faced the challenge of laying over 2,300 square feet of flooring, a daunting task at first, but fortunately, the CoreTec planks were designed for easy installation. This allowed us to tackle the entire project ourselves without needing professional help. We felt a great sense of accomplishment as we transformed our space, enjoying both the process and the final result of our hard work.
Once the flooring was finished, we transitioned smoothly to the trim work. We began by priming the trim to ensure a solid base, followed by painting it with Sherwin William semi gloss pure white for a clean and modern look. Once the trim was securely nailed in place, we meticulously filled any holes with DAP Plastic Wood putty to create a seamless appearance. After allowing the putty to dry, we sanded the areas for a smooth finish and touched up any spots with additional paint. The result was a polished and professional finish that perfectly complemented our new flooring.
"Room by Room: Painting Our Way to a Brighter Home"
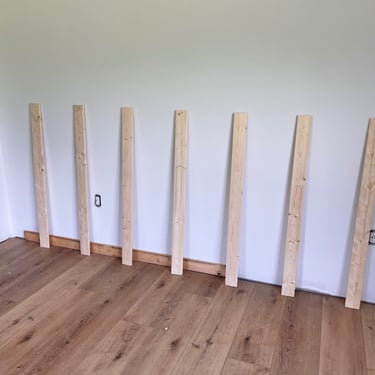
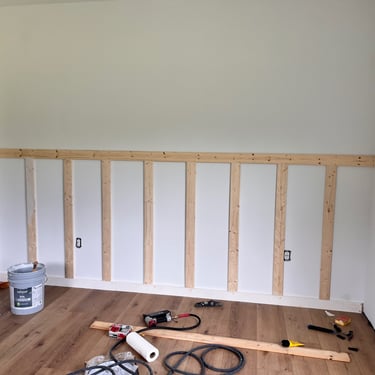
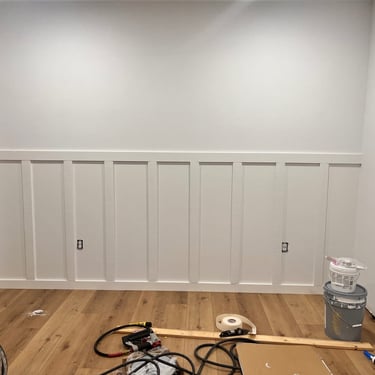
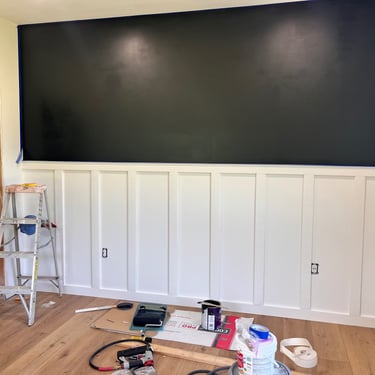
We next moved on to the exciting task of painting. Most of our home was brought to life with Sherwin Williams Snowbound, creating a bright and airy feel. For the baseboards, I chose Sherwin Williams Pure White, which nicely complemented the walls. In my daughter’s room, I opted for a soft yet stylish Sherwin Williams Repose Gray, giving it a serene atmosphere. My oldest daughter had a specific vision, so we transformed one of her walls into a beautiful half board and batten design, with the upper portion painted a bold Tricorn black from Sherwin William.
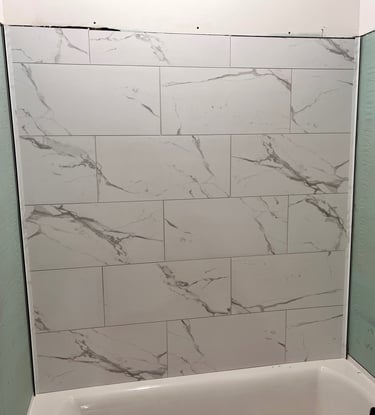
"Bathroom Finishes Complete: Cabinets, Tub, and Palisade Wall Tile Installed"
After tackling the girls' bathroom, we decided to make it a beautiful and functional space. We ventured to a local hardware store, where we found two stunning vanities that perfectly complemented our vision. For the tub, we chose a stylish option from Lowe's, ensuring both comfort and elegance. To elevate the overall aesthetic, we selected Palasade Carrara Marble Tile for the walls, a material I absolutely adore. Not only does this marble exude timeless beauty, but it is also easy to install and completely waterproof, making it perfect for a bathroom setting. With these choices, we are confident that the new bathroom will be both practical and inviting for the girls. Click here to see how to install Palisade Tile.
Life is a Juggle: Stay Tuned for the Next Update on the unexpected move-in after our shop floods.

This post contains affiliate links. This means I may earn a commission should you chose to sign up for a program or make a purchase using my link. I love all of these companies anyways, and you will too!
Life is A Juggle
Sharing our journey of family and home building.
© 2025. All rights reserved.